The key to spray painting is multiple, very thin coats. It only starts to look janky (PS we got Big T to start saying the word janky and it is HIL.AR.IOUS.) when you try to get it all covered in one spray because then it starts running and there's almost no way to fix that problem.
You also have to be super cognizant of the surface you're spraying - is it going to accept paint (i.e. wood, iron, steel, brass, cotton, cardboard, etc.) or is the paint just going to chill out on the surface and never actually dry (particle board, slick plastic, anything epoxied) - most annoying problem ever.
On Sunday I was a spray painting fool, cleaning up a few Tri City purchases, making some Halloween decks and giving a recent hand me down new life.
We recently got this wood holder from D's mom, which is great because they usually cost $60+, but it was in need of some major TLC. Tons of rust all over this guy and it's once black iron color was now a nubby rusty brown.
hello tetanus! tarp covering wood = not pretty.
This may seem like a no brainer but you definitely need to make sure you're in a well ventilated space with plenty of covers on anything you don't want splattered. I say that because the basement of our old rental may still have some black spots from spray painting adventures. Oops.
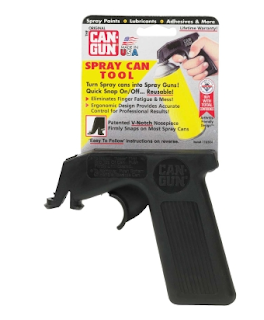
You also want to make sure you select a paint that's appropriate for your end use. For this project I used a Kyrlon indoor/outdoor in Forest Green but usually tend to use Rust-o-leum which has a TON of colors in various finishes, all great for indoor or outdoor use. I also have a few of these guys on hand which help with the old index finger crampage.
Make sure that when you're spraying you over extend on the edges. Example: if you are painting something with horizontal sprays like this wood holder, you spray left to right (or visa versa) but don't stop at the actual end of the piece you're working on, continue past it just a bit so that when you change direction go go back over you're work you don't glob up the ends (that's an official term) If you don't do this, you'll end up with spotty edges on your piece that will likely run and mess up the overall finish.
One more tip - if you're working on a rusty piece definitely try to scrape as much rust off as possible - the rust will soak up the paint quick and give you an uneven finish in places that don't have as much rust. If it's super uneven, scrape as must as you can off and use a spray on primer (available right next to the spray paint) to create a better base. You can also try your hand at painting some of those tricky surfaces (particle board, slick plastic, etc.) after you use a primer which usually creates the tacky base you need for a successful spray.
So here's this guy all cleaned up. It doesn't look that special unless you think about how crummy it looked before. I'll post some picks of it in it's new home once I finish up the Halloween decks.
What have you painted lately?
xoxo,
KC


I heart spray paint in a big way + you should absolutely start a spray paint series!
ReplyDelete♡ Lexi @ Glitter, Inc.