This new house has afforded us to each have a place to "conduct our business" haha. Basically he has a place to work on his side business with his brother (shameless plug: www.314threads.com) and work/scouring the internets for information about the NHL lockout. While I have a place to hoard my extra junk that won't fit in my closet, pay bills and think about all the things I want to decorate.
Deserving of an entirely dedicated post of its own, I won't go into the specifics on the plan I've hatched for my "office" but it does include these fabulous lamps that I found recently at a thrift store.
It also includes this: A caned seat chair I found at a thrift store for $10 a couple years ago. As soon as I saw it I knew I wanted to paint it, but surprisingly enough, once I got it home D was the one who thought we should preserve all the effort someone had put into hand painting all the detailing.
can you believe only $10 for this? the lines are great and the caning is in mint condition!
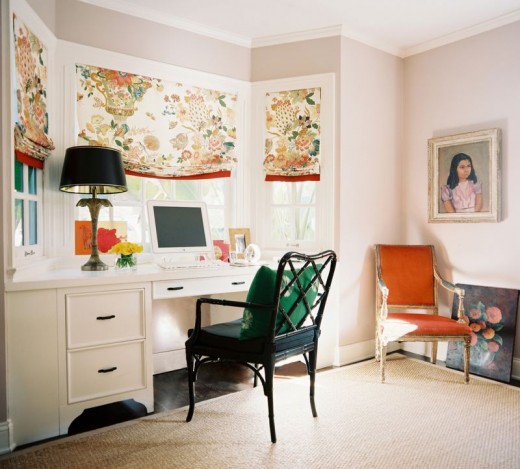
In it's new home, I felt like it was begging to be repainted and I even toyed with doing a fun combo of colors on the caned seat and the rest of the chair. But once I saw this image on Effortless Style, I was compelled to go glossy black!
Marilen Rentmeeser's office via
This office is so interesting, because it has a lot of neutrals and yet it's totally an interesting show stopper with the pops of red. Black lacquer here I come!
I totally think the lines look more modern now in the glossy black. And the hand detailing is still barely visible but in texture only which I kind of love.
i spy a little pup sunning herself
So excited to finish up the office. Back with what I'm doing to the desk + some storage ideas later this week.
xoxo,
KC


Hey, maybe a roll up shade covered with the black check fabric + a cornice and/or side panels (3/4 length?) would be really cute in there?
ReplyDeleteYou could easily handle that with your new sewing skills, Katie. The shade is just a spray on adhesive and reset the shade. Side panels could be just flat/lined panels with a rod pocket (to be hidden by the cornice). And the cornice could even be a coordinating fabric (over bunting) if you think it's needed but 'too much'. An alternative fabric would tone it down, yet pull the look together with the cornice ... perhaps a smaller check, or a small print in the same colors and fabric type. Consider a simple 1 1/2" dowel/pole painted white and held by interior cups -- inside the cornice -- for panels to hang from.
ReplyDeleteRemember not to scimp on the width of the cornice -- let its ends go enough beyond the window to have room to stack the curtain panels off the window...giving you the most light possible into the room, and also making the window itself look bigger on the wall. (Just not so much that, when stacked, your curtains look not full enough to fill the space.) Probably a cornice 5 inches off the window on both sides would be plenty.
If you bring all your measurements with you at Thanksgiving...we can whip this out in a couple hours. The only thing I might worry about you handling yourself the first time is matching up that check pattern.... It's easy once you think it thru and do it once...but I could understand your hesitancy to get started.